<?xml version="1.0" encoding="utf-8"?><feed xmlns="http://www.w3.org/2005/Atom" ><generator uri="https://jekyllrb.com/" version="3.10.0">Jekyll</generator><link href="https://zerodaygamer.com/feed.xml" rel="self" type="application/atom+xml" /><link href="https://zerodaygamer.com/" rel="alternate" type="text/html" /><updated>2026-07-15T21:03:29+08:00</updated><id>https://zerodaygamer.com/feed.xml</id><title type="html">YadoreZ</title><subtitle>Writeups and field notes on reverse engineering, game hacking, malware analysis, and robotics — by YadoreZ.</subtitle><author><name>YadoreZ</name></author><entry><title type="html">Start with the Robotics Hacking Journey</title><link href="https://zerodaygamer.com/writeups/start-the-robotics-journey/" rel="alternate" type="text/html" title="Start with the Robotics Hacking Journey" /><published>2026-07-16T00:43:10+08:00</published><updated>2026-07-16T00:43:10+08:00</updated><id>https://zerodaygamer.com/writeups/start-the-robotics-journey</id><content type="html" xml:base="https://zerodaygamer.com/writeups/start-the-robotics-journey/"><![CDATA[<p>How I got interested in this? Well, I was applying for a reverse engineering role in a certain company and the interviewer informed me that they are getting into robotics. Finding an RE job here in Philippines is quite hard so I just kept applying for positions that has RE in them but this specific interview, although I did not pass the interview, it spark something inside me and it got me searching and interested in Robotics Hacking.</p>
<p>So, how do I begin with it? I asked claude. To be honest, I’m having doubts because a robot??? How do I test that and oh, before the test part how do I freaking acquire a robot, that’s sounds expensive. So, instead of just giving up, I just directly ask Claude to give me resources and how do I begin. So while discussing with Claude some alternatives, he suggest me a robot arm and some expensive stuff but the good thing about Claude is that, you tell him you’re poor and he will suggest an alternative and that’s where we decided to start with ROS2 on Ubuntu VM.</p>

<p>Now that I know ROS2 is where I should start with. I createad a virtual machine running Ubuntu 22.04. After that, I installed the necessary stuff needed for ROS2.</p>

<div class="language-bash highlighter-rouge"><div class="highlight"><pre class="highlight"><code><span class="c"># Step 1 — Locale setup</span>
<span class="nb">sudo </span>apt update <span class="o">&amp;&amp;</span> <span class="nb">sudo </span>apt <span class="nb">install </span>locales <span class="nt">-y</span>
<span class="nb">sudo </span>locale-gen en_US en_US.UTF-8
<span class="nb">sudo </span>update-locale <span class="nv">LC_ALL</span><span class="o">=</span>en_US.UTF-8 <span class="nv">LANG</span><span class="o">=</span>en_US.UTF-8

<span class="c"># Step 2 — Add universe repo</span>
<span class="nb">sudo </span>apt <span class="nb">install </span>software-properties-common <span class="nt">-y</span>
<span class="nb">sudo </span>add-apt-repository universe

<span class="c"># Step 3 — Add ROS2 GPG key</span>
<span class="nb">sudo </span>apt update <span class="o">&amp;&amp;</span> <span class="nb">sudo </span>apt <span class="nb">install </span>curl <span class="nt">-y</span>
<span class="nb">sudo </span>curl <span class="nt">-sSL</span> https://raw.githubusercontent.com/ros/rosdistro/master/ros.key <span class="se">\</span>
  <span class="nt">-o</span> /usr/share/keyrings/ros-archive-keyring.gpg

<span class="c"># Step 4 — Add ROS2 repository</span>
<span class="nb">echo</span> <span class="s2">"deb [arch=</span><span class="si">$(</span>dpkg <span class="nt">--print-architecture</span><span class="si">)</span><span class="s2"> signed-by=/usr/share/keyrings/ros-archive-keyring.gpg] http://packages.ros.org/ros2/ubuntu </span><span class="si">$(</span><span class="nb">.</span> /etc/os-release <span class="o">&amp;&amp;</span> <span class="nb">echo</span> <span class="nv">$UBUNTU_CODENAME</span><span class="si">)</span><span class="s2"> main"</span> | <span class="nb">sudo tee</span> /etc/apt/sources.list.d/ros2.list <span class="o">&gt;</span> /dev/null

<span class="c"># Step 5 — Install</span>
<span class="nb">sudo </span>apt update
<span class="nb">sudo </span>apt <span class="nb">install </span>ros-humble-desktop <span class="nt">-y</span>
</code></pre></div></div>

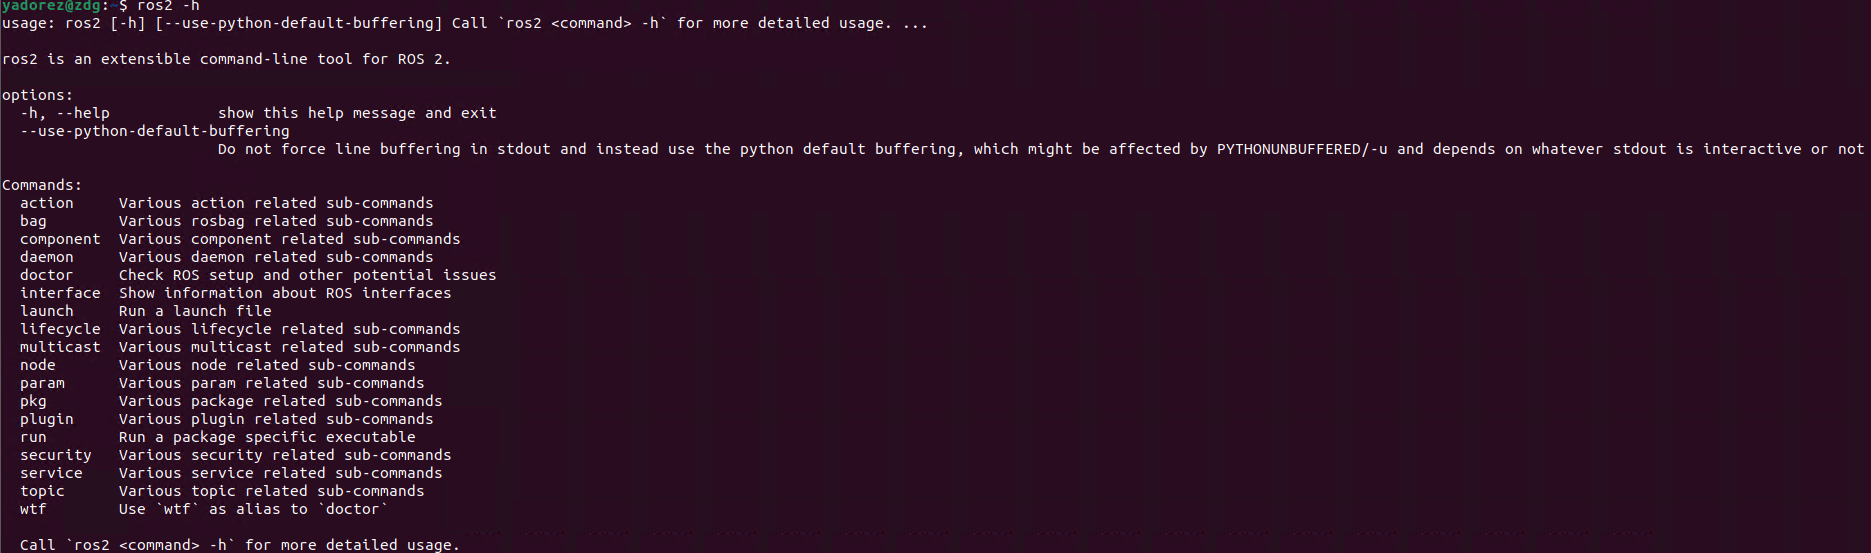
<p>Once done with the steps above, I proceed to confirm that ros2 is running by executing the command</p>
<div class="language-bash highlighter-rouge"><div class="highlight"><pre class="highlight"><code>ros2 <span class="nt">-h</span>
</code></pre></div></div>

<p><img src="/images/ros-1.png" alt="ros2 installation" /></p>

<p>If running ros2 is not working, try adding ros2 to the source.</p>

<div class="language-bash highlighter-rouge"><div class="highlight"><pre class="highlight"><code><span class="nb">echo</span> <span class="s2">"source /opt/ros/humble/setup.bash"</span> <span class="o">&gt;&gt;</span> ~/.bashrc
<span class="nb">source</span> ~/.bashrc
</code></pre></div></div>

<p>Now that everything is already setup, we are proceeding on trying to do the ROS2 Topic Injection Attack. In all honesty, this is pretty new to me so I may be wrong or not but hey, I’m just documenting my progress.</p>

<p>So before everything else, what is ROS2 by the way? ROS2 is Robot Operating System Framework, ROS2 helps program/nodes to talk to each other through publish/subscribe model. So for this blog, I will be creating a talker and listener. Talker is the publisher where it will share information and publishes message to a named topic “/chatter”. The publisher does not care who listens, it will just keep on broadcasting. Next is the Listener or subscriber. It will subscribe to “/chatter” and does not care who send it, it will just listen to it and receive all message published there. The topic “/chatter” is just a named channel. Like a radio frequency, anyone can tune on it.</p>

<p>If we will convert it to a robot equivalent, a camera program/node publishes a message in /camera/image topic or a gps node where it publishes message on /location topic. So basically, each of this nodes, talk together through topics constantly. That’s where Topic Injection came to place, ROS2 by default has no concept of identity or trust and that what I’m going to show below.</p>

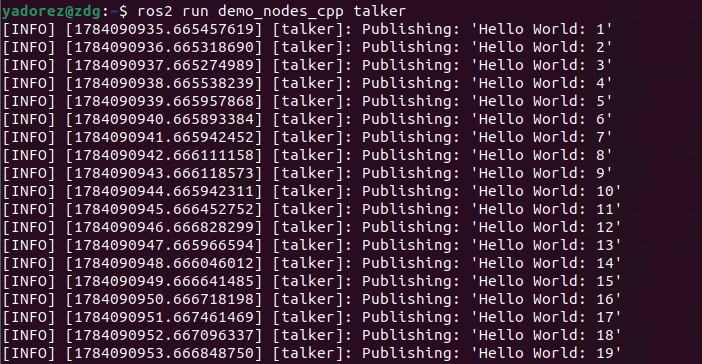
<p>To begin, we will need to setup a “talker”</p>

<div class="language-bash highlighter-rouge"><div class="highlight"><pre class="highlight"><code>ros2 run demo_nodes_cpp talker
</code></pre></div></div>

<p><img src="/images/ros-2.png" alt="ros2 talker" /></p>

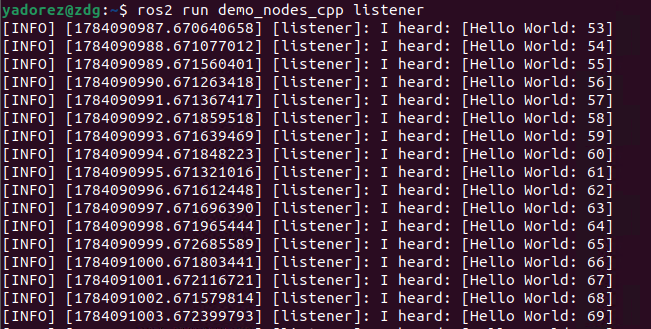
<p>Now, we are able to publish hello world message on /chatter. Next is we setup the listener, where it should be able to receive a message that is publish.</p>

<div class="language-bash highlighter-rouge"><div class="highlight"><pre class="highlight"><code>ros2 run demo_nodes_cpp listener
</code></pre></div></div>

<p><img src="/images/ros-3.png" alt="ros2 listener" /></p>

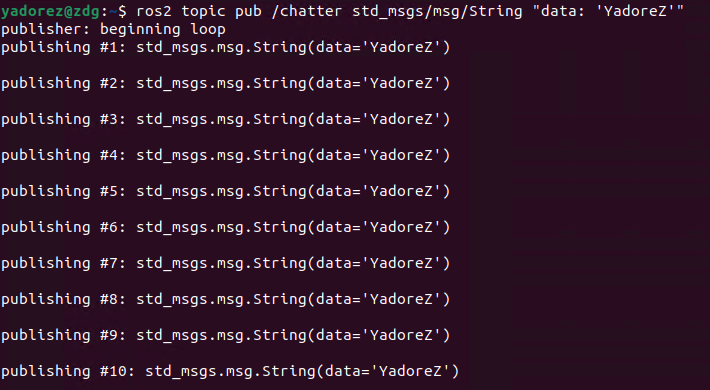
<p>Running the command allows us to listen to messages publish on the /chatter and we can see base on the screenshot that it is saying “I heard”. Now that we are able to setup the talker and listener, it is now time to attempt to inject a message on the /chatter topic.</p>

<div class="language-bash highlighter-rouge"><div class="highlight"><pre class="highlight"><code>ros2 topic pub /chatter std_msgs/msg/String <span class="s2">"data: 'YadoreZ'"</span>
</code></pre></div></div>

<p><img src="/images/ros-4.png" alt="ros2 injection" /></p>

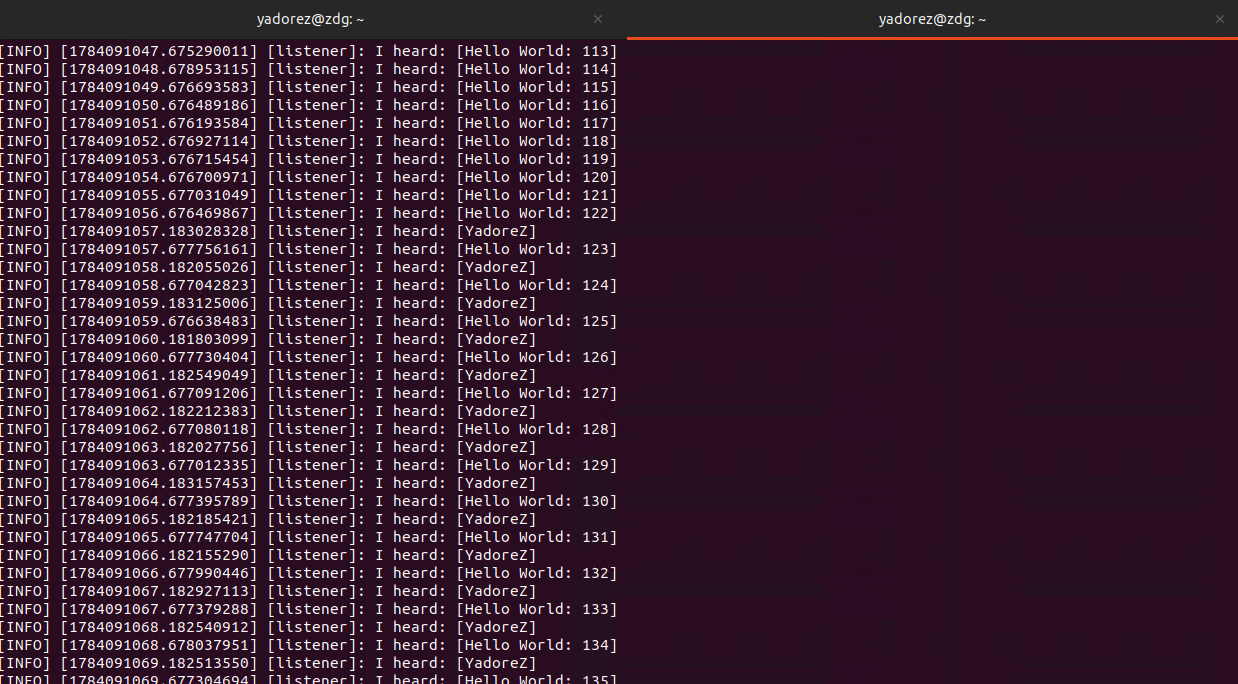
<p>The command shows now that we are sending data to the /chatter topic. Then if we check our listener tab, we should be able to see our injected message.</p>

<p><img src="/images/ros-5.png" alt="ros2 injected message" /></p>

<p>Based on this screenshot, we are able to confirm that our message ‘YadoreZ’ is published on the /chatter and the listener was able to acquire or received the message. In robotics, a good scenario that I can think of is if the /location was somehow an attacker is able to provide a fake location to where a robot should go.</p>

<p>So that was it. My first attempt to study and blog my robotics hacking journey!</p>]]></content><author><name>YadoreZ</name></author><category term="robo" /><summary type="html"><![CDATA[How I got interested in this? Well, I was applying for a reverse engineering role in a certain company and the interviewer informed me that they are getting into robotics. Finding an RE job here in Philippines is quite hard so I just kept applying for positions that has RE in them but this specific interview, although I did not pass the interview, it spark something inside me and it got me searching and interested in Robotics Hacking.]]></summary></entry><entry><title type="html">[GameHacking] - Cheat Engine Step 9</title><link href="https://zerodaygamer.com/writeups/cheat-engine-tutorial/" rel="alternate" type="text/html" title="[GameHacking] - Cheat Engine Step 9" /><published>2026-01-12T07:49:10+08:00</published><updated>2026-01-12T07:49:10+08:00</updated><id>https://zerodaygamer.com/writeups/cheat-engine-tutorial</id><content type="html" xml:base="https://zerodaygamer.com/writeups/cheat-engine-tutorial/"><![CDATA[<p>Well, its been a while since I posted. So to restore my blog, I decided to just show my solution on how I solved Cheat Engine Step 9 tutorial.</p>

<p>I’m following GuidedHacking Game Hacking Bible (Again) since I stopped with Game Hacking to pursue certifications stuff but this time, I promise to focus on Game Hacking instead and less certification for this year.</p>

<p>Since, I just came back, I decided to redo all the Guided Hacking tutorial and now, I’m on Step 5 “Cheat Engine Tutorial Video Guide”</p>

<p>I’ll skipped all the other process and just put my solution here.</p>

<pre><code class="language-asm">alloc(newmem,2048)
label(returnhere)
label(originalcode)
label(enemy)
label(exit)

newmem: //this is allocated memory, you have read,write,execute access
cmp [ebx+10],1
jne enemy
fldz
jmp originalcode+5

enemy:
mov [ebx+04],0
fldz
jmp exit

originalcode:
mov [ebx+04], eax
fldz

exit:
jmp returnhere

"Tutorial-i386.exe"+29D8D:
jmp newmem
returnhere:
</code></pre>

<p>This is my code injection and using this, I was able to solve the last part that should instakill the 2 enemy but will keep my 2 player alive.</p>]]></content><author><name>YadoreZ</name></author><category term="gh" /><summary type="html"><![CDATA[Well, its been a while since I posted. So to restore my blog, I decided to just show my solution on how I solved Cheat Engine Step 9 tutorial.]]></summary></entry><entry><title type="html">[CrackMe] - NoName_vs’ Verry easy kid friendly crackme</title><link href="https://zerodaygamer.com/writeups/crackme-noname-vs-verry-easy-kid-friendly-crackme/" rel="alternate" type="text/html" title="[CrackMe] - NoName_vs’ Verry easy kid friendly crackme" /><published>2025-05-14T23:29:08+08:00</published><updated>2025-05-14T23:29:08+08:00</updated><id>https://zerodaygamer.com/writeups/crackme-noname-vs-verry-easy-kid-friendly-crackme</id><content type="html" xml:base="https://zerodaygamer.com/writeups/crackme-noname-vs-verry-easy-kid-friendly-crackme/"><![CDATA[<p>Another crackme solved! – Just got lucky!!</p>

<p>So far this is the crackme that took me a while to solve. Not Verry easy (for me), since it took me a lot of time to solve this but overall, it is great! It will teach you a lot of stuff in performing reverse engineering.</p>

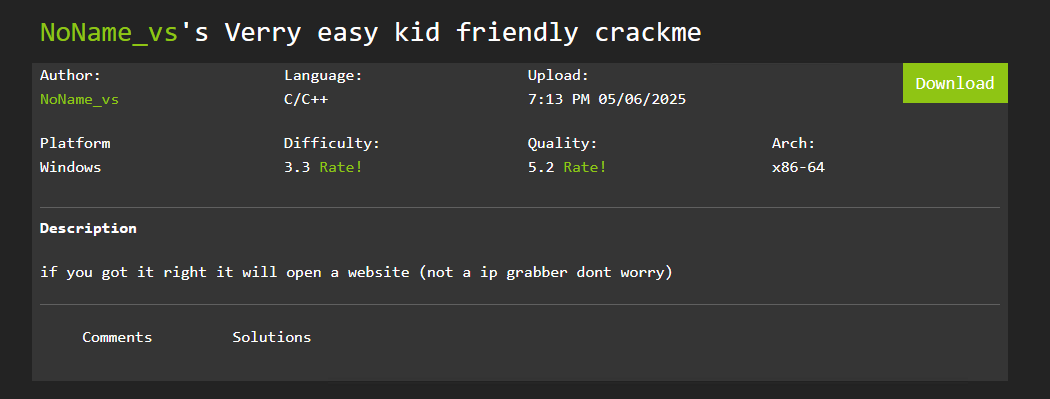
<p>Here’s the detail of the Crackme made by NoName_vs
<img src="/images/verryeasy-1.png" alt="Verry easy kid friendly" /></p>

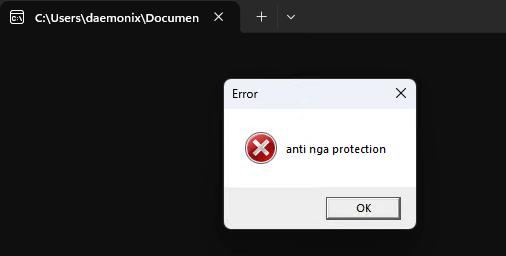
<p>Running the executable would display a MessageBox that says “anti nga protection”. Its confusing at first since there is no debugger or disassembler running on the background so my initial thought was maybe because this executable is able to detect that I am running it on a Virtual Machine. I find this cool as this executable is able to implement defense mechanism and I’ll be able to try to bypass those in order to properly understand how the executable works.</p>

<p><img src="/images/verryeasy-2.png" alt="anti nga protection" /></p>

<p>So before running this on x64dbg, I have everything set in mind that this executable has a lot of defensive mechanism in place!</p>

<p><img src="/images/verryeasy-3.png" alt="CFF Explorer" /></p>

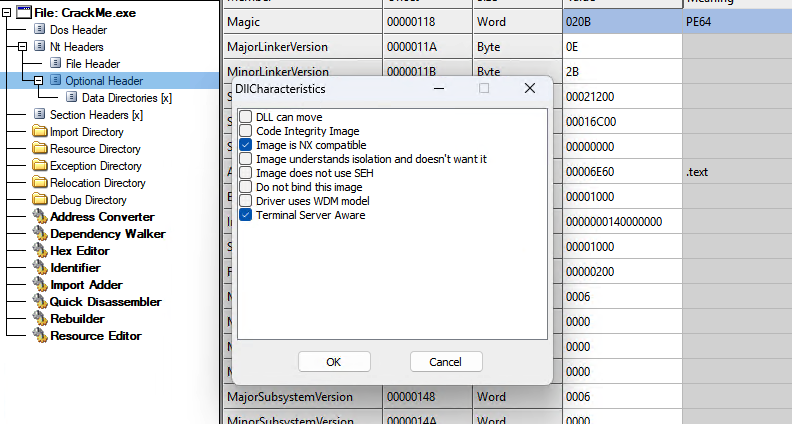
<p>I always disable DLL can move in CFF explorer to ensure that my breakpoints would be reliable and also I want to make sure I can see the address in Ghidra as well. If I won’t disable ASLR, the address could be different everytime I load it on x64dbg.</p>

<p>Ok, hear me out, initially I mentioned that I have set in mind that this executable has a lot of defensive mechanism in place so when I saw the TLS Callback on the breakpoint I was like damn there’s a TLS callback. I might as well search for it but before I took my time here I just run this on PE-Bear and CFF explorer and saw that TLS Callback do not have a value and that is where I realized that it is on gdi32full.dll not on my executable. I had to use both PE-Bear and CFF Explorer to confirm and once I confirmed, I return to x64dbg and damn I was noob haha!</p>

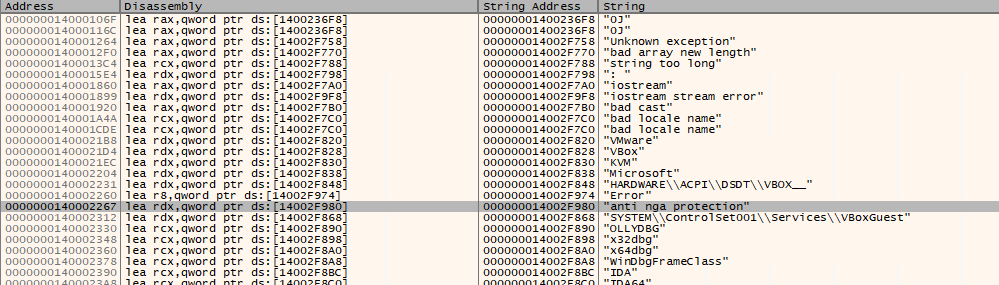
<p>Anyways, I run the executable until I am at the Entry Point of the executable. After that, I went on to perform “Search For &gt; Current Region &gt; String References”. Since we know the error message after running the executable which is the “anti nga protection” we can search for that.</p>

<p><img src="/images/verryeasy-5.png" alt="String Reference" /></p>

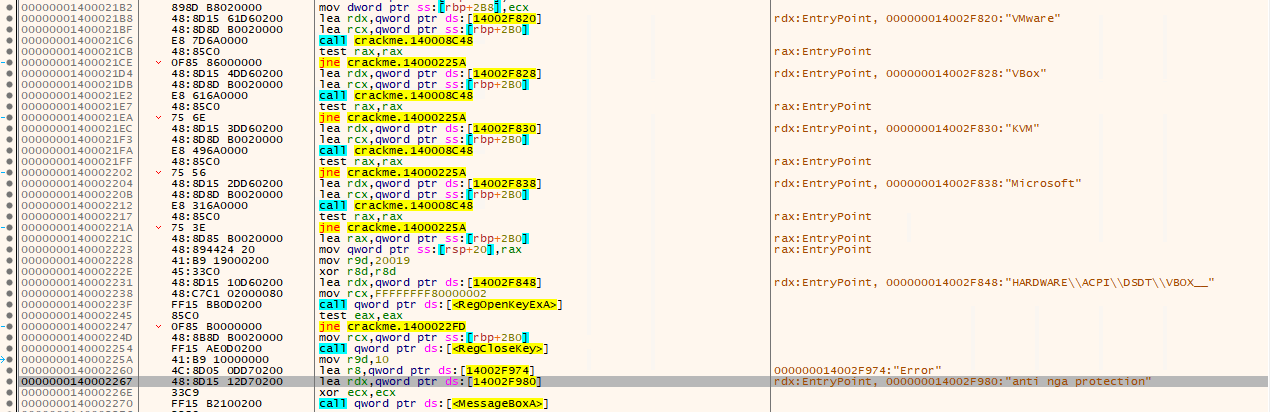
<p>Now, I follow the string in the disassembler.</p>

<p><img src="/images/verryeasy-6.png" alt="Disassembler" /></p>

<p>Following in the disassembler, I was able to see some pointers loaded to RDX before a CALL instruction and the contents are strings like VMware, VBox, etc. After the CALL instruction it will perform test rax, rax then run the JNE instruction.</p>

<p><img src="/images/verryeasy-7.png" alt="VMware String" /></p>

<p>I noticed the Jump Not Equal instruction to be jumping to the string “anti nga protection” if condition not met. So what I did, I patched this executable simply changing the test eax, eax to xor eax, eax from all the checks that I feel relevant for me such as IsDebuggerPresent, VMWare, Microsoft, x64dbg. Once I am able to run the executable in debugger without encountering the error “anti nga protection” then I’m all good.</p>

<p><img src="/images/verryeasy-8.png" alt="Login" /></p>

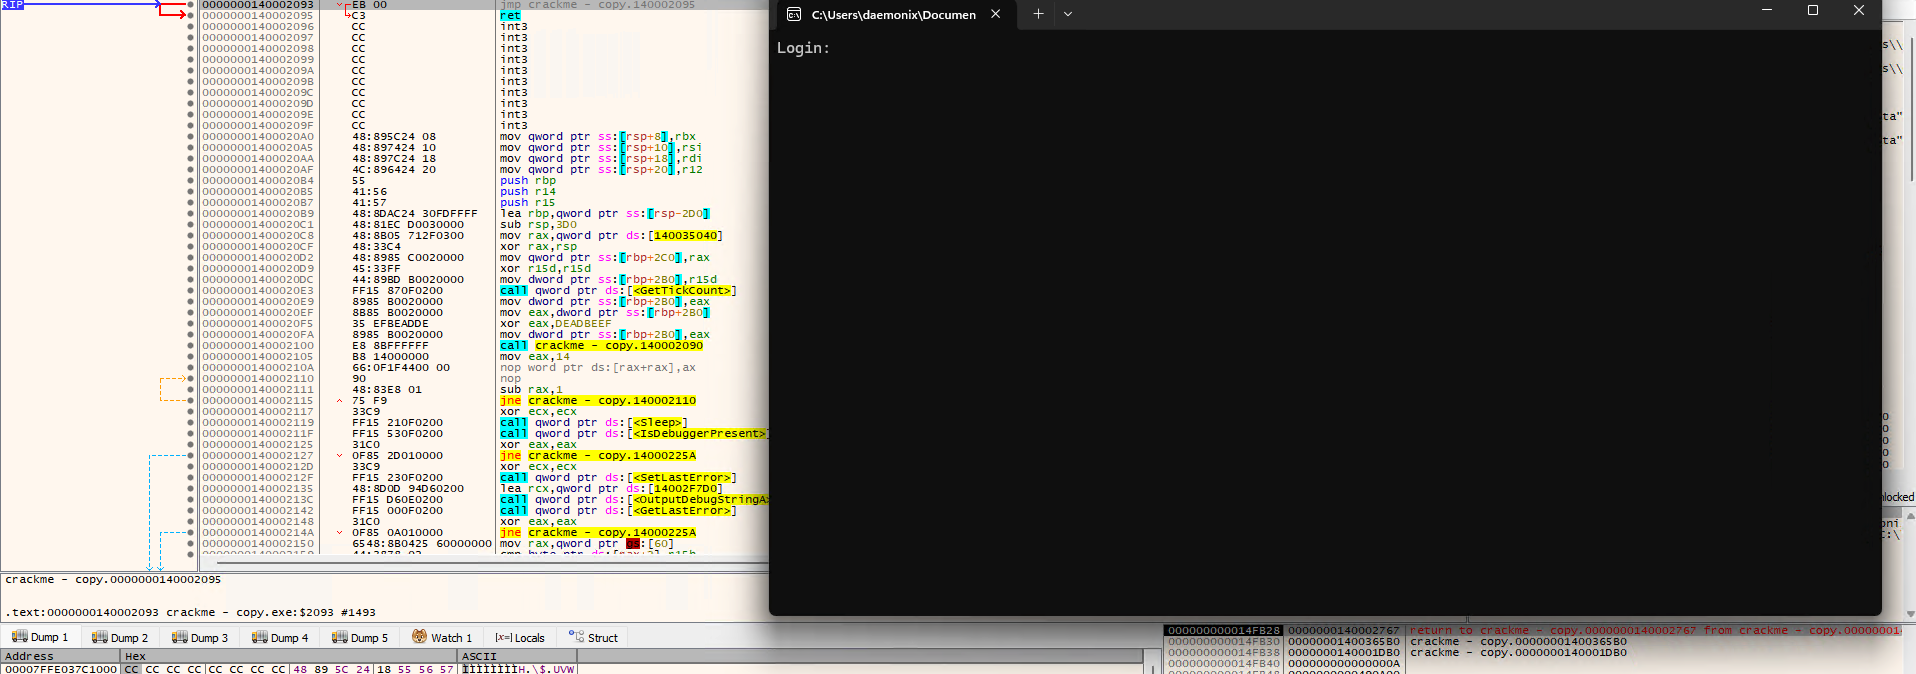
<p>After patching, I run the executable again in the debugger. This time, instead of receiving an error prompt, I was able to see a string “Login:” in the prompt.</p>

<p><img src="/images/verryeasy-9.png" alt="Wrong Login" /></p>

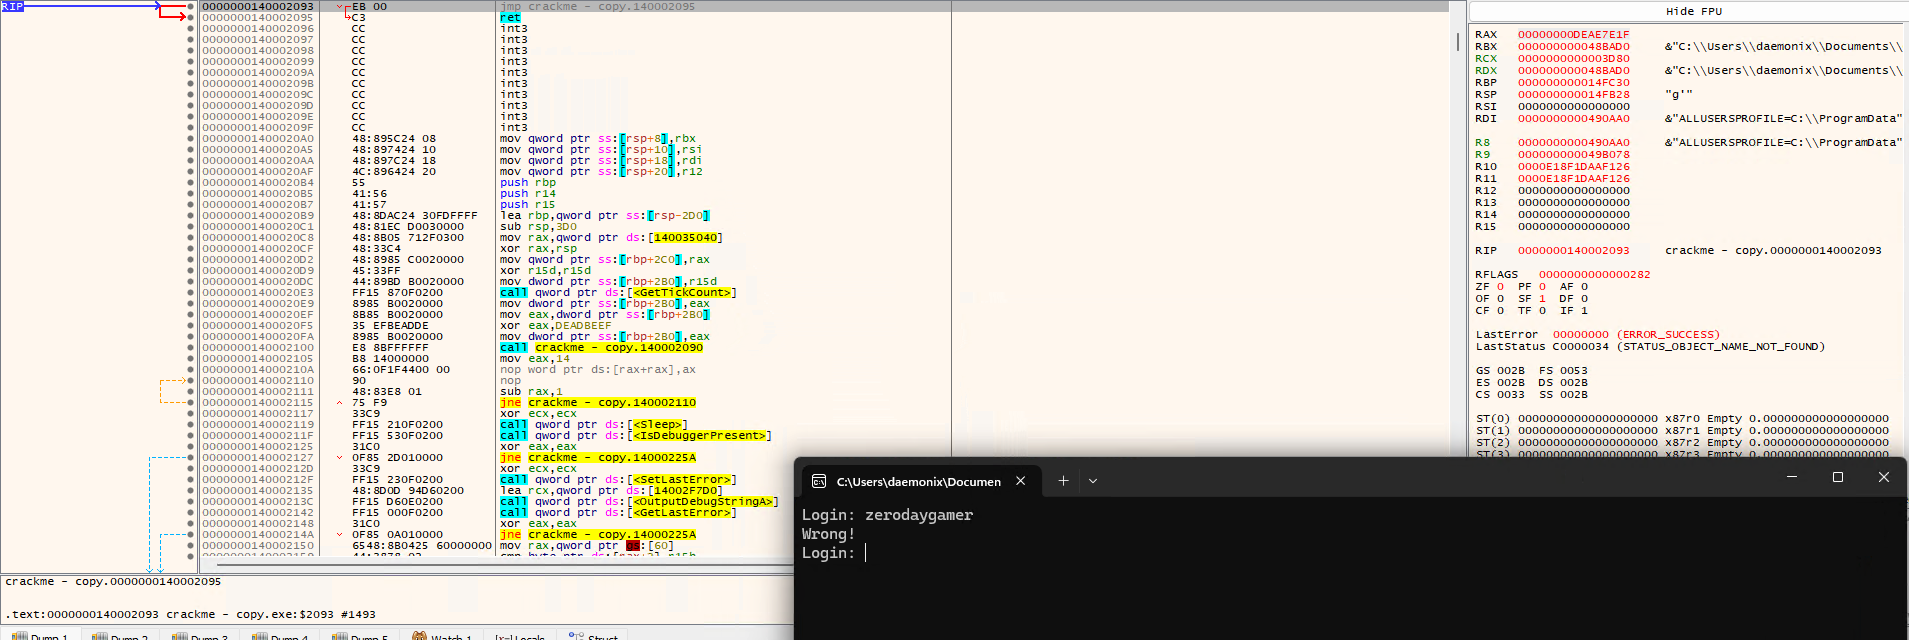
<p>I tried inputting password such as “zerodaygamer” and received a “Wrong!” response but I noticed that the debugger does not seem to react or change? I’m not sure what happen but it feels like this prompt is not happening within the executable. Then I thought to myself there must be something wrong with I did, so I restart the executable within the debugger then input the same password “zerodaygamer” again. This time I was able to see my input in the CPU region or disassembler.</p>

<p><img src="/images/verryeasy-10.png" alt="Restart Again" /></p>

<p>As you can see on the CPU region, there is zerodaygamer on 0x1400020B9 and 0x1400020DC. One is to store my input in rbp while the other is to clear my inputs from r15 by xor. Knowing that at 0x1400020B9, the pointer to my input is accessed then storing that to rbp, I set a hardware breakpoint on that address. Then this time I tried using “zerodaygamer” as Login creds then nothing happens. I removed the hardware breakpoint and tried setting a normal breakpoint but this time, after setting a breakpoint, the R15 on register appears to have a value which is my input zerodaygamer.</p>

<p><img src="/images/verryeasy-11.png" alt="R15" /></p>

<p>I right click the value in R15 and select follow in dump, once in dump, I select breakpoint &gt; Hardware, Access &gt; Byte. The reason for this is that it should hit a breakpoint whenever the application tries to access my input.</p>

<p><img src="/images/verryeasy-12.png" alt="Breakthrough" /></p>

<p>Yes, I did it! I am now somewhere in memory where the executable is accessing my inputs, probably to compare? Not yet sure.</p>

<p>Since I am already here and not sure what to look for next, I did what a beginner like me would do, without any idea of what’s going on. Click step over and hope that I would stumble on something. Then nothing, I reached the “Login:” prompt again without seeing something that interest me. So, rerun again! This time I look closely!</p>

<p><img src="/images/verryeasy-13.png" alt="Looping" /></p>

<p>I saw a loop, but since I have step over this one earlier, I now know that this one is counting the character in my inputs but not sure why though. So this time, I copy the address and look it up on Ghidra and maybe from there I can clearly understand this part.</p>

<p><img src="/images/verryeasy-14.png" alt="Ghidra" /></p>

<p>Upon checking the address on Ghidra, I was able to see on the decompiler that there is a check if the string contains 8 characters. Since zerodaygamer is longer than 8 character, I thought to myself, what if the length of my input is also 8 character, that’s where I thought of using ‘password’ as my input.</p>

<p><img src="/images/verryeasy-15.png" alt="Don't look back" /></p>

<p>There’s a difference between stepping over using ‘zerodaygamer’ and ‘password’ as inputs. This time, I felt like it takes a little longer before “Wrong!” is displayed on the prompt so I keep on clicking F8 and then I reach a part of the memory where I was able to see “Access Granted” on the CPU region. This feels like I’m getting somewhere.</p>

<p><img src="/images/verryeasy-16.png" alt="Let me in" /></p>

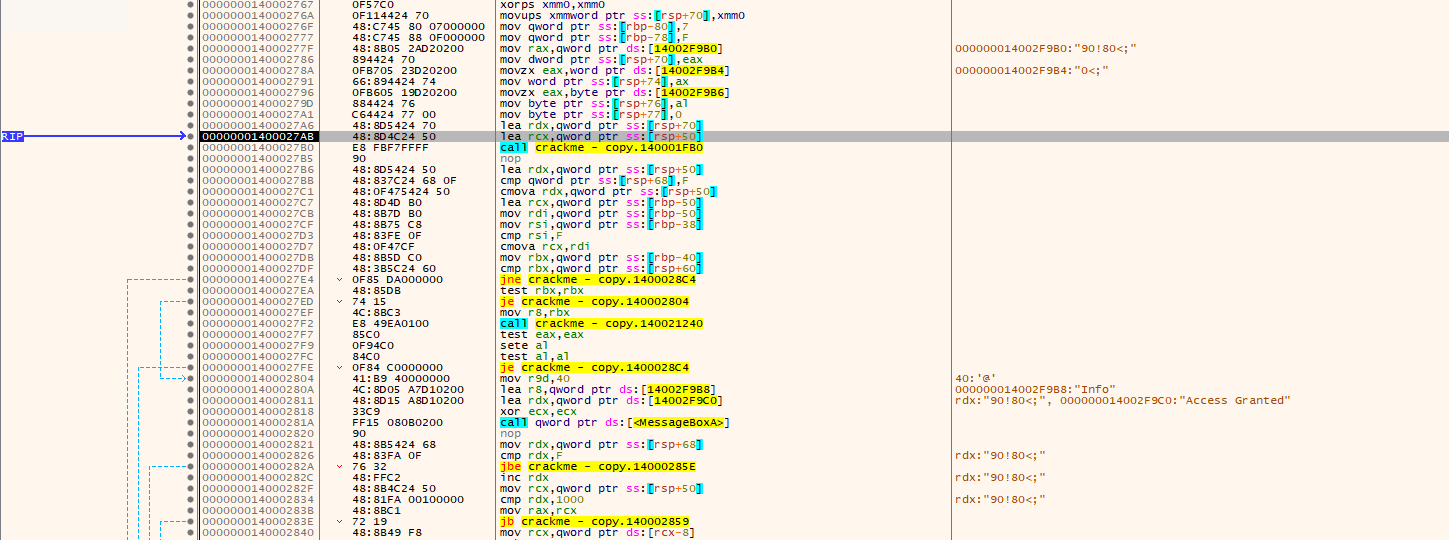
<p>After hitting the call at the memory address 0x1400027B0, I saw the string letmein in my Registers and found this a little fishyyyy!! Is this what I’m looking for??? So before I try this one, I set a breakpoint on the CALL instruction then copy that address and look it up on Ghidra.</p>

<p><img src="/images/verryeasy-17.png" alt="Let me in" /></p>

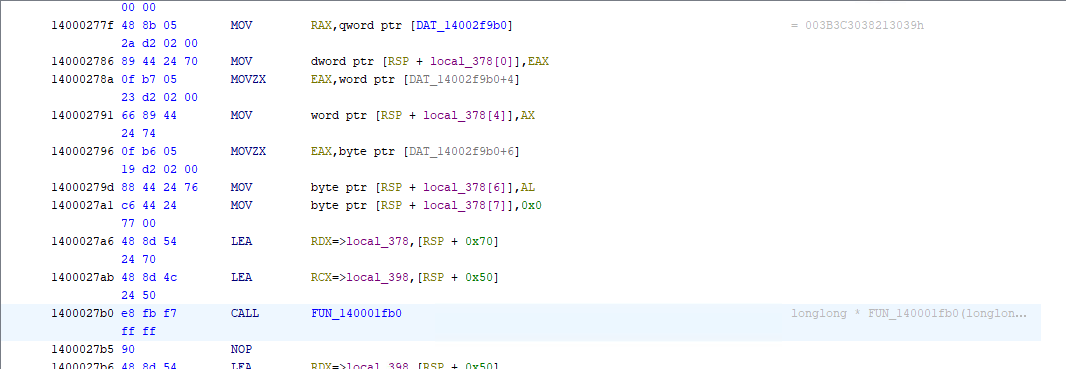
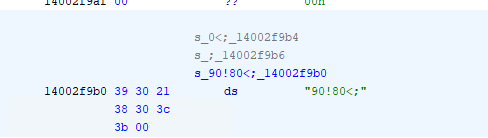
<p>In Ghidra, I was planning on going inside the Call to FUN_140001fb0 but saw that above it, on the address 0x14000277f, there is a DATA address with value 003B3C3038213039h. I double clicked that one to go directly to it. There I right click DAT_14002f9b0 and select Data &gt; string.</p>

<p><img src="/images/verryeasy-18.png" alt="Let me in" /></p>

<p>After converting it to string, it looked gibberish to me but feels like it was obfuscated since after the call I was able to see letmein on the Registers.</p>

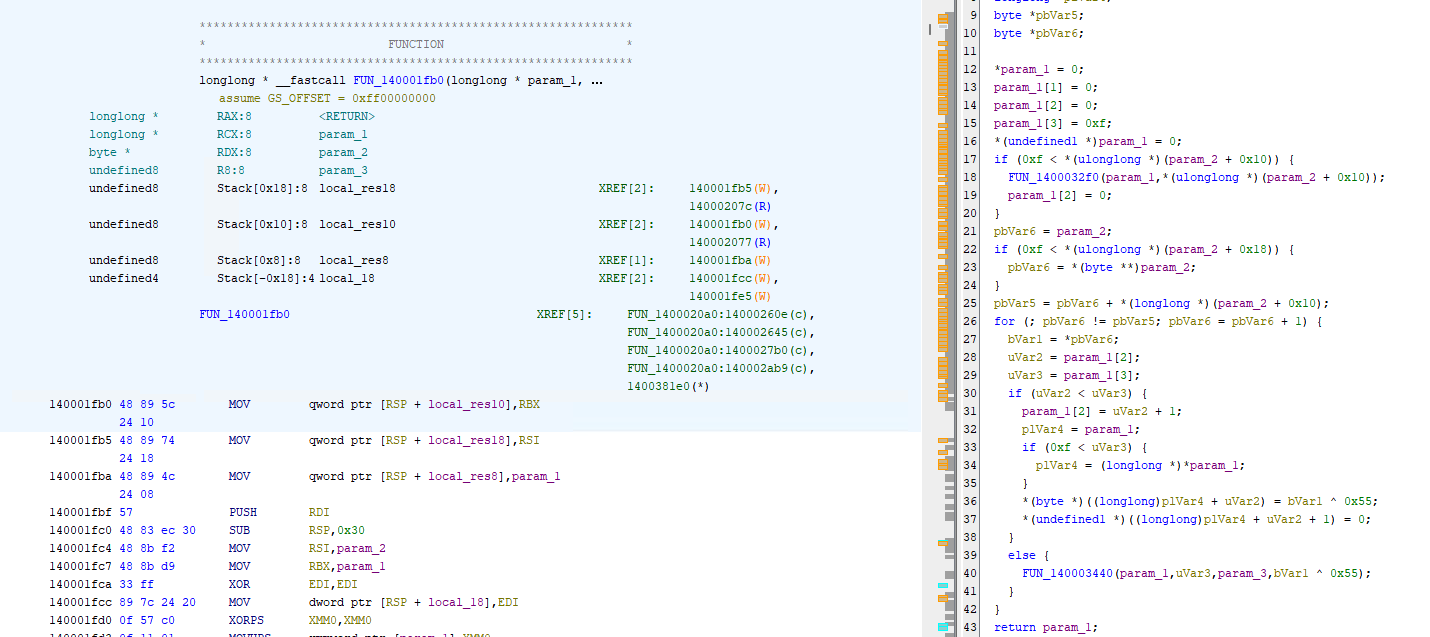
<p><img src="/images/verryeasy-19.png" alt="Function to Debofuscate" /></p>

<p>I now proceeded to go inside the function and when I checked the decompiler, I saw the string 0x55 and thought to myself instantly that is the XOR key for this, is gotta be it, right?</p>

<p><img src="/images/verryeasy-20.png" alt="Cyberchef" /></p>

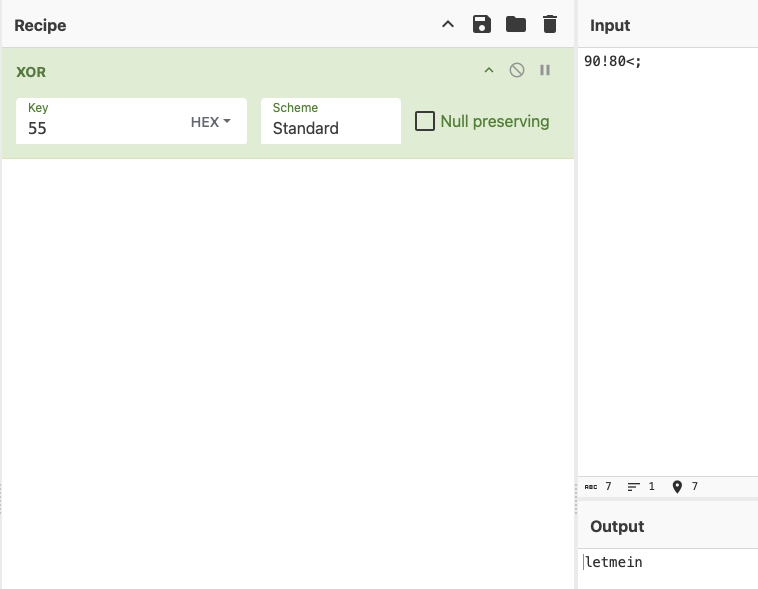
<p>So without hesitating, I quickly open Cyberchef and then voila. I was able to see the function that deobfuscate the hex string and also saw the correct credential “letmein”</p>

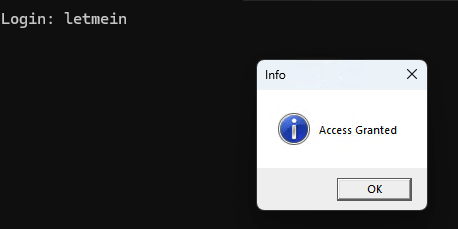
<p><img src="/images/verryeasy-21.png" alt="Cyberchef" /></p>

<p>I was able to solve it but there’s something wrong. The password is correct but the author mentioned that if I’m correct, it will open a website but this one does not. I decided to redo everything but still using the ‘password’ as my password since that’s where it got me to where I am and probably see where are the other checks I overlook.</p>

<p><img src="/images/verryeasy-22.png" alt="Another String" /></p>

<p>I saw another string in my register and this time it is ‘aikmnioi’. After stepping over on 0x1400028C4, that string shows up on my register. Continuing stepping over, I was not able to hit anything that would tell me how aikmnioi was deobfuscated.</p>

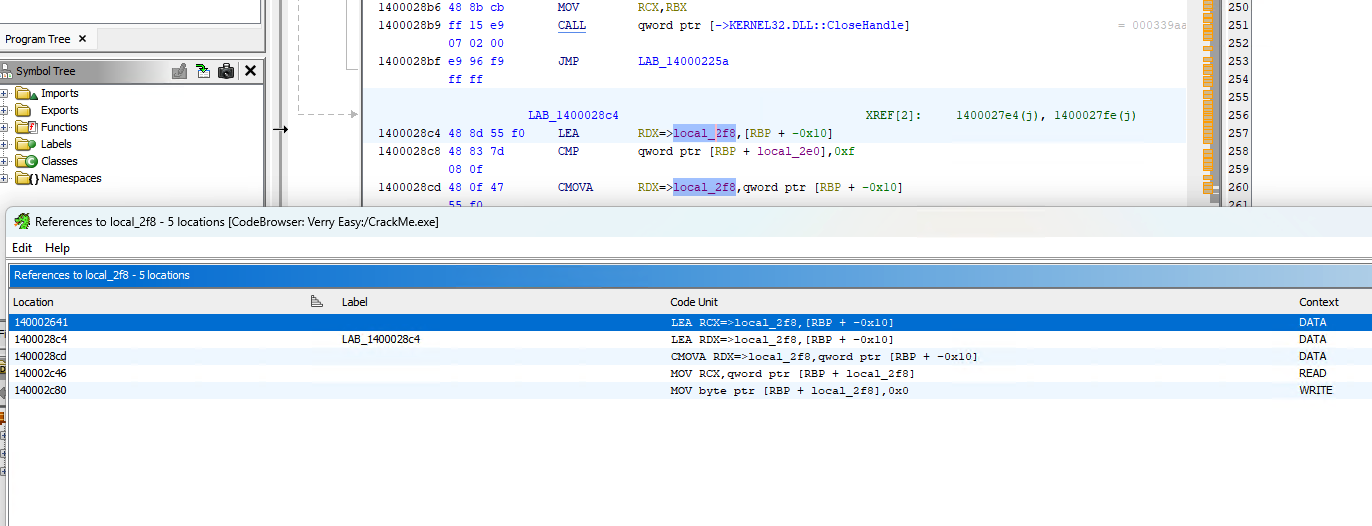
<p><img src="/images/verryeasy-23.png" alt="Reference to local_2f8" /></p>

<p>I open Ghidra again and this time go directly to 0x1400028C4, from there I right clicked local_2f8 and shows references to that variable. I selected the first one which is 0x140002641.</p>

<p><img src="/images/verryeasy-24.png" alt="Hex again" /></p>

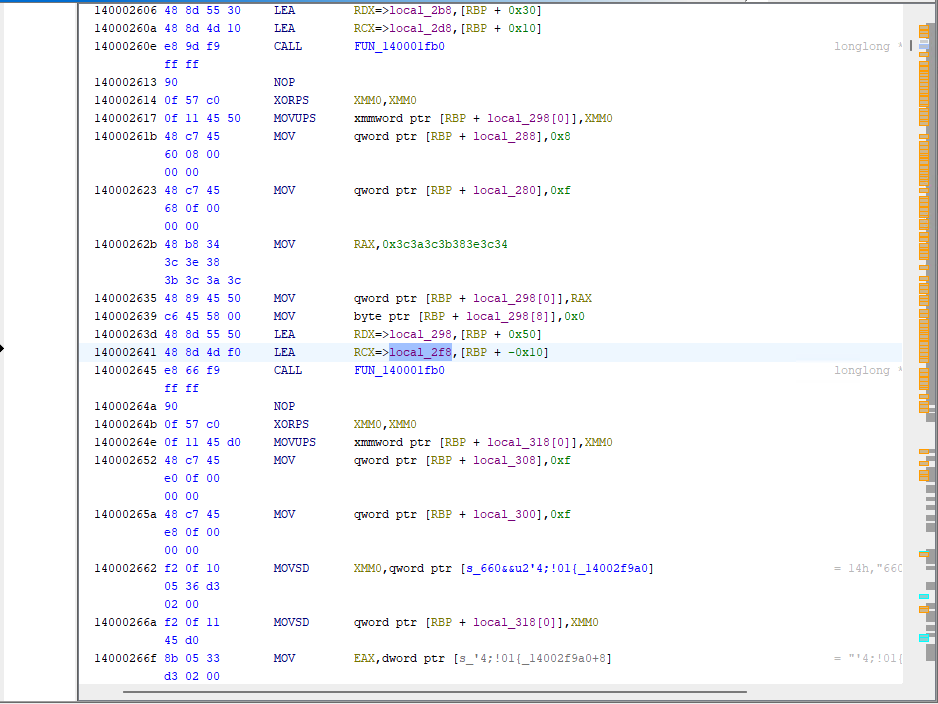
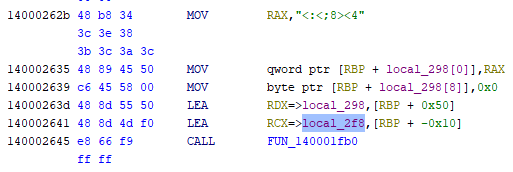
<p>On the Listing view, on memory address 0x14000262b, there seems to be a hex character which looks like the same like ‘letmein’. I clicked it and select convert &gt; Character Sequence</p>

<p><img src="/images/verryeasy-25.png" alt="Convert that hex" /></p>

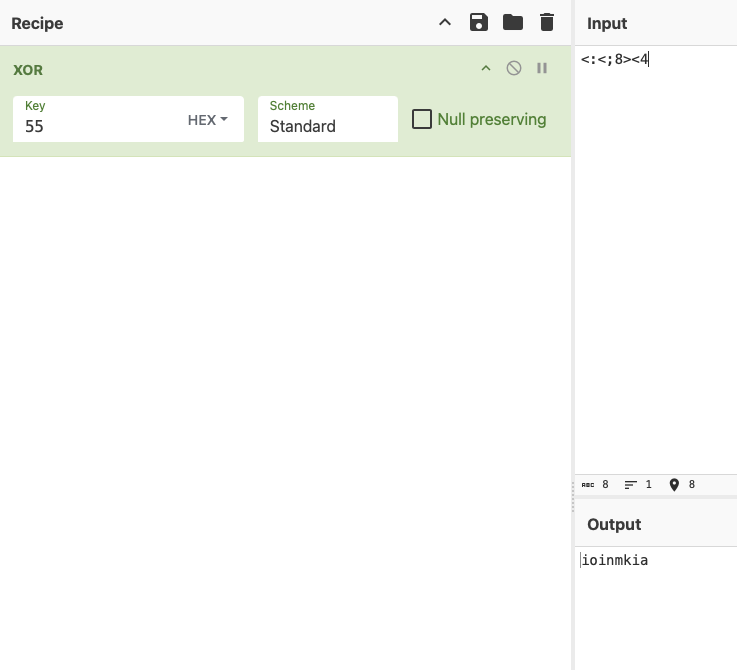
<p>Now that the value is change, we can see a CALL to  FUN_140001fb0, which is the function that is called also in order to deobfuscate ‘letmein’ earlier. With that in mind, we can also deobfuscate tha character sequence using 0x55 as XOR key</p>

<p><img src="/images/verryeasy-26.png" alt="Chef again" /></p>

<p>And there it is, I was able to see and confirmed that the second password is aikmnioi, it is in reverse in the screenshot probably because of LIFO structure.</p>

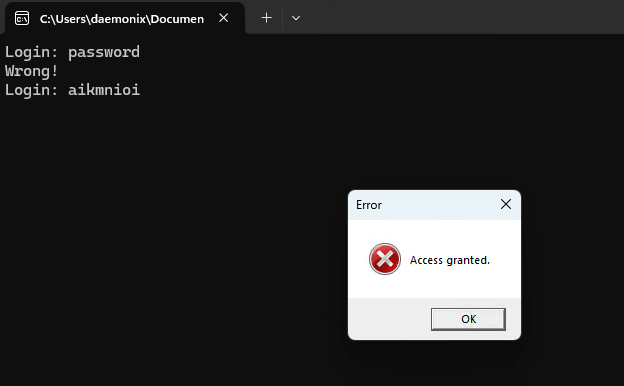
<p><img src="/images/verryeasy-27.png" alt="Access is Granted!" /></p>

<p>Inputting the password ‘aikmnioi’ shows an error but with string “Access Granted”.</p>

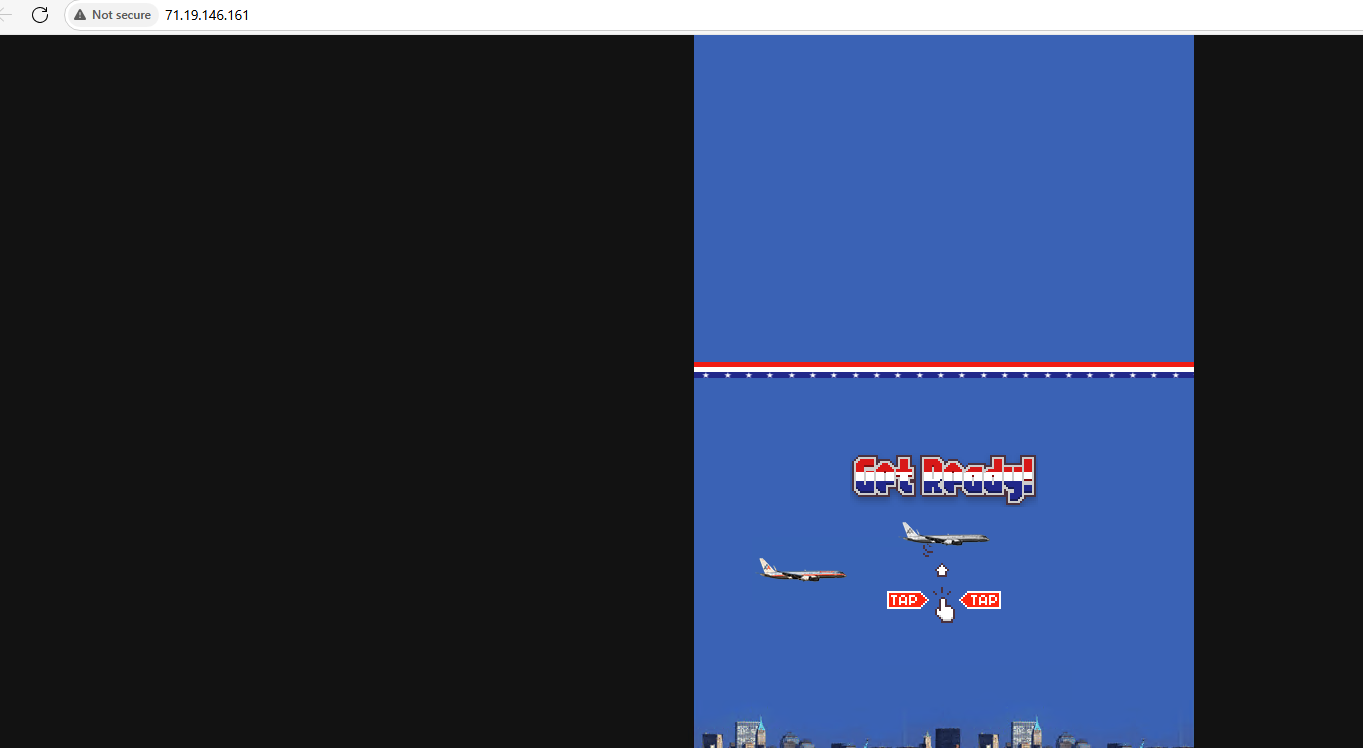
<p><img src="/images/verryeasy-28.png" alt="That's the website" /></p>

<p>Clicking the ‘Ok’ button will open the website the author mentioned.</p>

<p>That was it, finally able to solve another CrackMe. This is tougher that what I thought it would be since the tile says “Verry Easy”.</p>]]></content><author><name>YadoreZ</name></author><category term="re" /><summary type="html"><![CDATA[Another crackme solved! – Just got lucky!!]]></summary></entry><entry><title type="html">[CrackMe] - kwenma’s C++ Obfuscator</title><link href="https://zerodaygamer.com/writeups/crackme-kwenma-s-c-obfuscator/" rel="alternate" type="text/html" title="[CrackMe] - kwenma’s C++ Obfuscator" /><published>2025-05-01T21:27:48+08:00</published><updated>2025-05-01T21:27:48+08:00</updated><id>https://zerodaygamer.com/writeups/crackme-kwenma-s-c-obfuscator</id><content type="html" xml:base="https://zerodaygamer.com/writeups/crackme-kwenma-s-c-obfuscator/"><![CDATA[<p>I now went to solve another Crackme challenge. The difficulty rating of this one is 2.8 and the quality is 4.0.</p>

<p>How I solve crackme is, if I got the correct password then it’s done. As long as I’m able to get the correct one then I conclude that the challenge is over. I’m not sure if this is the way but I figure that since it only ask for the password and if I provided it correctly then the challenge is done.</p>

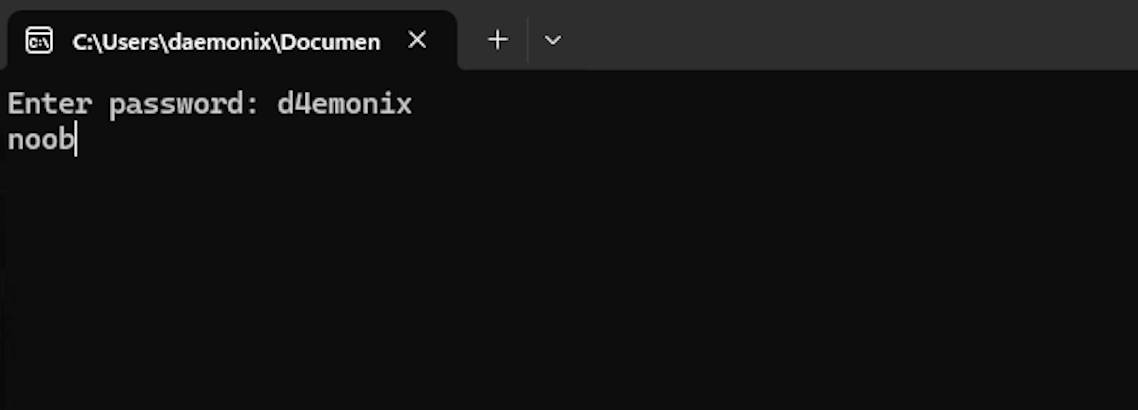
<p>Running the executable would ask you to enter a password, wrong password will result to a string response of “noob” and the executable closes.</p>

<p><img src="/images/obfuscator-1.png" alt="Executing the exe file" /></p>

<p>I opened this on Ghidra right away to see some symbols worth noting or even strings so I can see where I can start to look.</p>

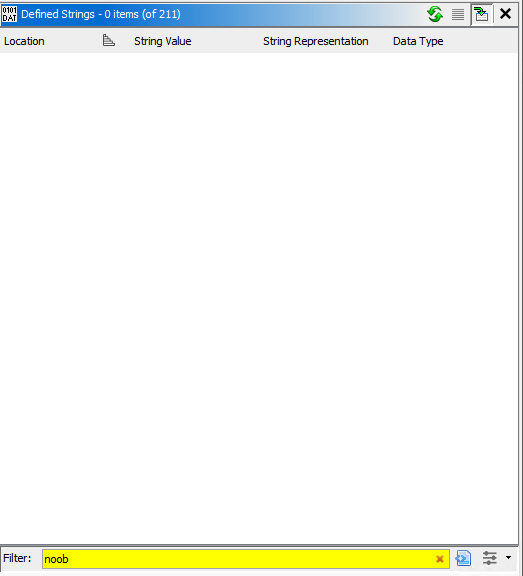
<p><img src="/images/obfuscator-2.png" alt="Symbol Reference" /></p>

<p>I tried searching for the string “noob” but was not able to see it on Defined Strings. This could mean that the string is obfuscated in some way then maybe it is deobfuscated in some point to compare the user input to the correct password then print “noob” if it is incorrect.</p>

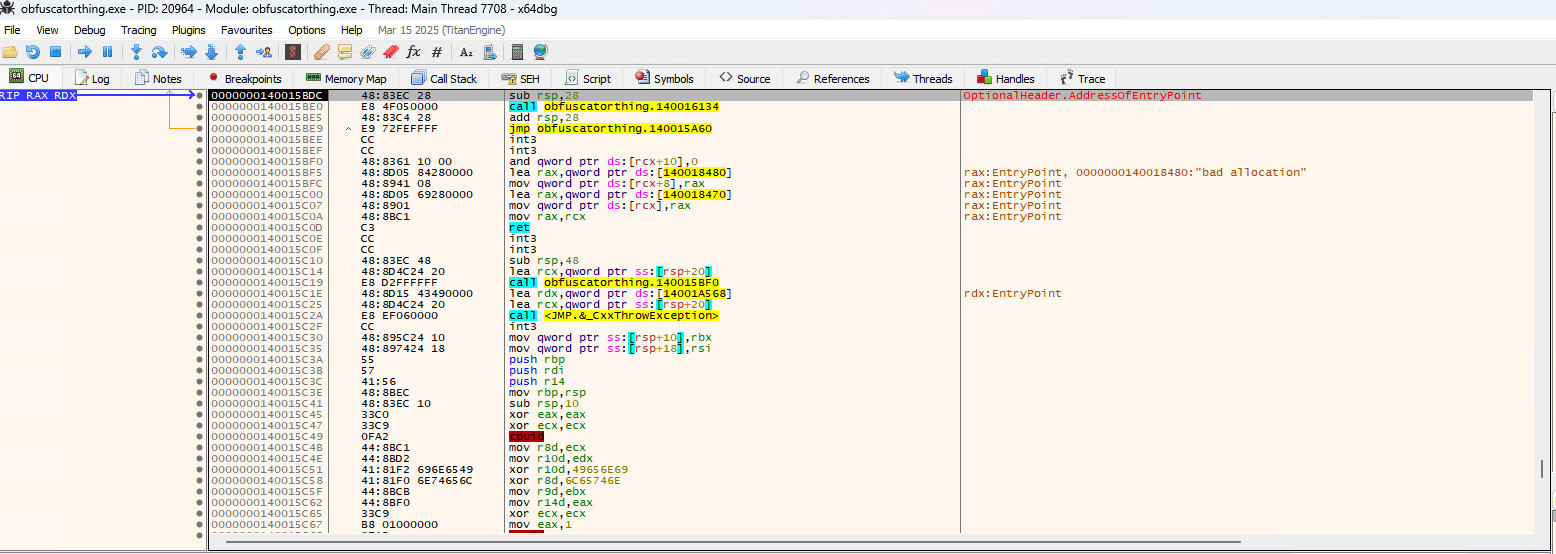
<p>Since that is the theory I thought of, I opened x64dbg. Before I open the executable on x64dbg, I make sure to uncheck the “DLL can move” using CFF explorer so that the address will be the same with the one in Ghidra since ASLR randomize the Memory Address when it runs.</p>

<p><img src="/images/obfuscator-3.png" alt="x64dbg" /></p>

<p>After loading the executable on x64dbg, I run it once to make sure it will pause on the Entry Point of the executable. Once it is on the Entry Point, I search for intermodular calls / API calls on the current region.</p>

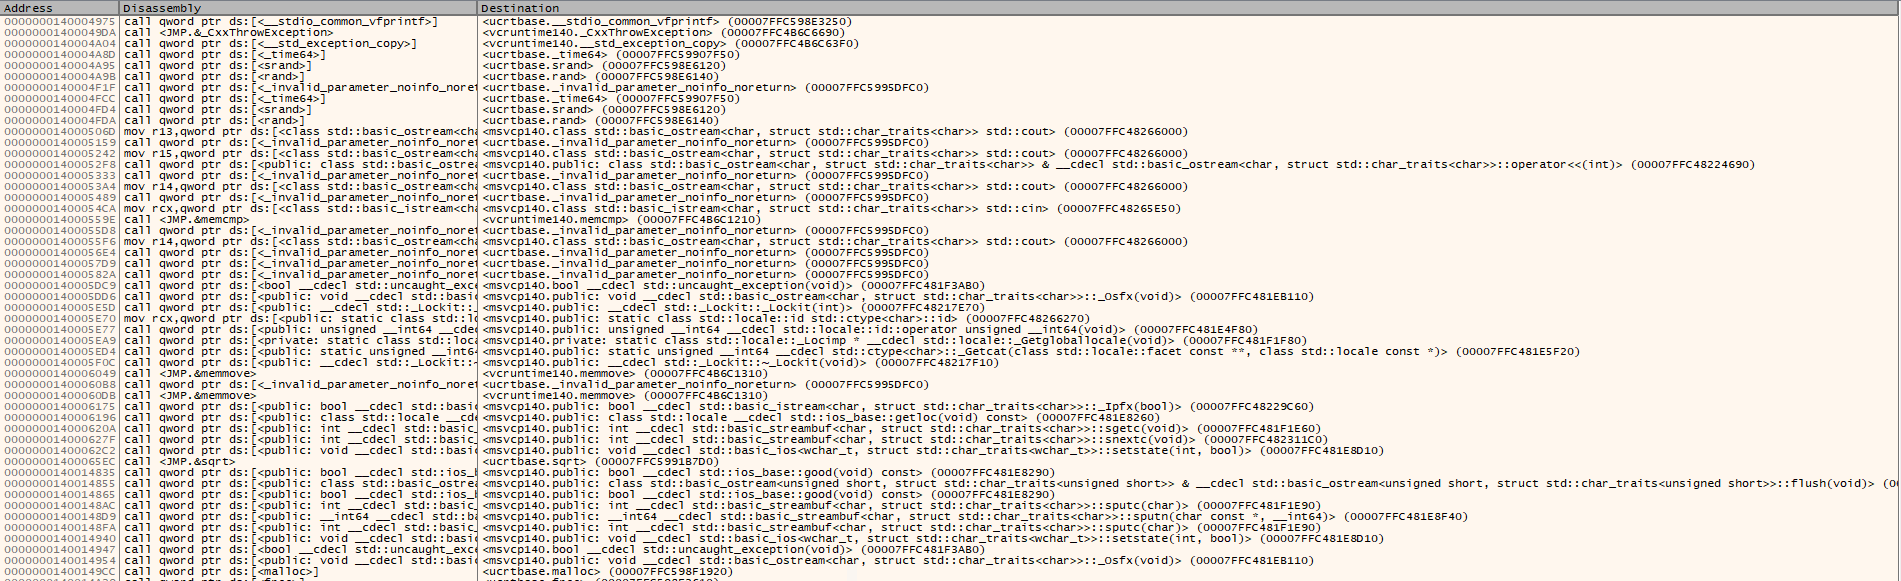
<p><img src="/images/obfuscator-4.png" alt="Intermodular Calls" /></p>

<p>These are some of the intermodular calls in the memory region. I thought of setting a breakpoint on one of the iostream but I opted to manually step over and watch the registers to see if there is something interesting happening.</p>

<p><img src="/images/obfuscator-5.png" alt="Stepping over memory address" /></p>

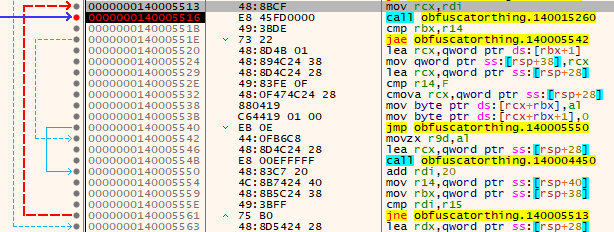
<p>While I manually step over, I noticed a loop starting on address “0000000140005513”. Then a call on “0000000140005516”.</p>

<p><img src="/images/obfuscator-6.png" alt="Loop" /></p>

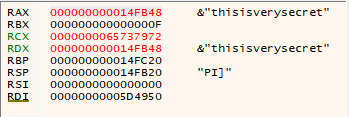
<p>Allowing the loop to run, we can see that the registers display the unobfuscated version of the correct password which is “thisisverysecret”</p>

<p>If we try to input “thisisverysecret” without x64dbg, simply input it on the executable, we won’t see anything and it just closes but this time without the word “noob”.</p>

<p><img src="/images/obfuscator-7.png" alt="Correct License Key" /></p>

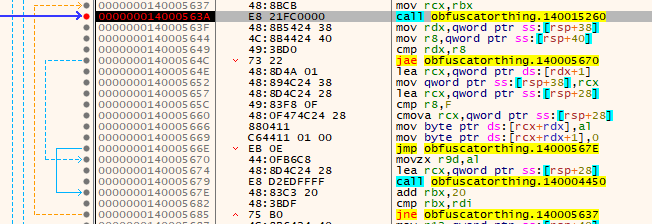
<p>I run this again on debugger to check if that is normal, then I saw that there is another loop that occurs starting from the memory address “0000000140005637”. If we allow the executable to run or execute this loop.</p>

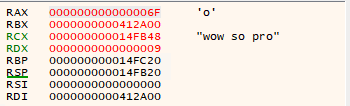
<p><img src="/images/obfuscator-8.png" alt="Wow So Pro" /></p>

<p>We can see that it prints or outputs “wow so pro”.</p>]]></content><author><name>YadoreZ</name></author><category term="re" /><summary type="html"><![CDATA[I now went to solve another Crackme challenge. The difficulty rating of this one is 2.8 and the quality is 4.0.]]></summary></entry><entry><title type="html">My First CrackMe</title><link href="https://zerodaygamer.com/writeups/my-first-crackme/" rel="alternate" type="text/html" title="My First CrackMe" /><published>2025-05-01T21:27:12+08:00</published><updated>2025-05-01T21:27:12+08:00</updated><id>https://zerodaygamer.com/writeups/my-first-crackme</id><content type="html" xml:base="https://zerodaygamer.com/writeups/my-first-crackme/"><![CDATA[<p>After earning my GREM and PMRP, I thought of looking for a job that has Reverse Engineering or Malware Research. It’s been like 15days already and I received a 1 unfortunately and a lot of no response on all my application. So I thought to myself that, certification is certainly not enough to show how passionate or how much I wanted to be in Reverse Engineering field so I decided to learn Game Hacking from GuidedHacking (again! had to stop since I enrolled on a lot of courses last year and early this year) and also start with Crackmes.</p>

<p>My first crackme was “Simple crackme by ionchad”. You can try it or download it <a href="https://crackmes.one/crackme/67fd376f8f555589f3530b9d">here</a>.</p>

<p>Solution:</p>

<p>After downloading and unzipping the file, it contains an exe file named “WinUtilsHelper.exe”</p>

<p><img src="/images/winutil-1.png" alt="Executable File" /></p>

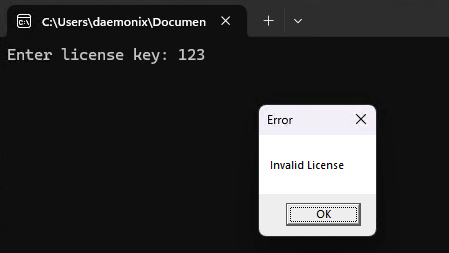
<p>If you run the executable, it will prompt you to enter a license key. Inputting an incorrect value will pop a message that says invalid license.</p>

<p><img src="/images/winutil-2.png" alt="MessageBox" /></p>

<p>With that information, I thought of the Windows’ API that is used to display an error message and that is the Windows’ MessageBox.</p>

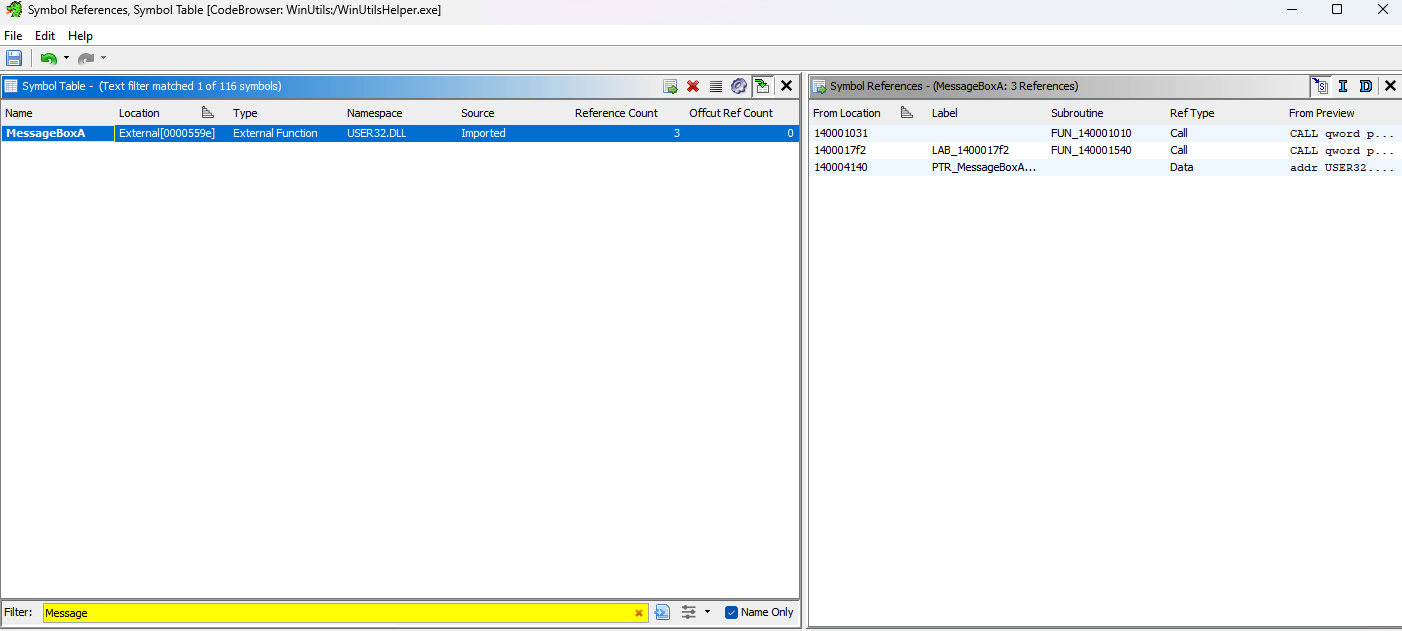
<p>I open Ghidra and created a new project for this executable. On Ghidra, I go to “Windows &gt; Symbol References” and Search for “Message”.</p>

<p><img src="/images/winutil-3.png" alt="Ghidra Symbol Reference" /></p>

<p>There will be 3 Location from where the MessageBoxA is referenced. I clicked on the memory address 140001031. Clicking on that Memory Address automatically update the listing view in Ghidra so that you are on that specific Memory Address.</p>

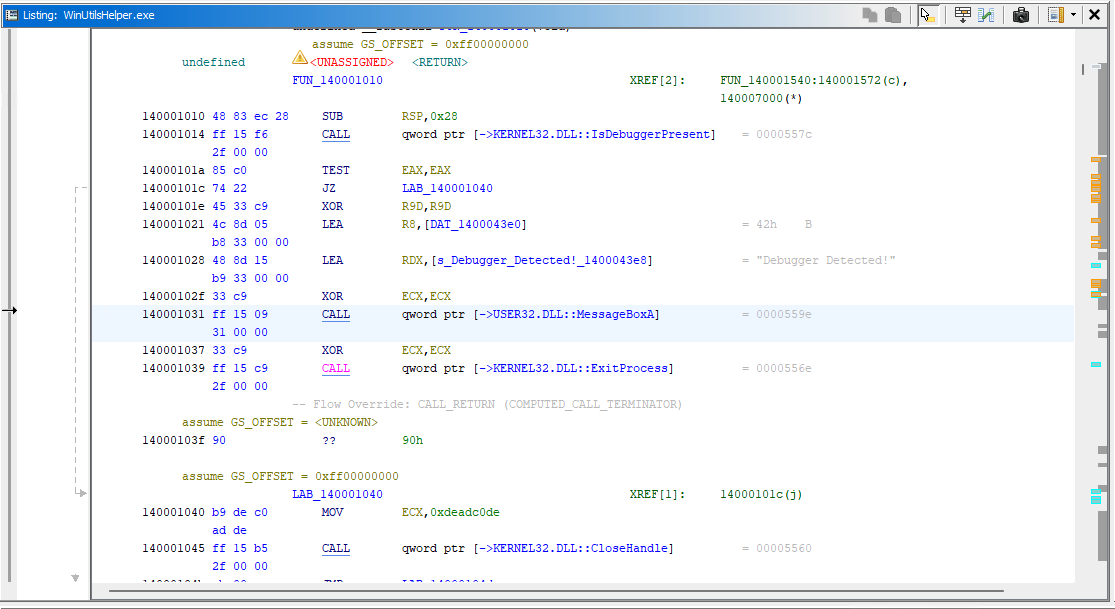
<p><img src="/images/winutil-4.png" alt="Memory Address" /></p>

<p>Here we can see that the first Call to MessageBoxA was used to display the message “Debugger Detected” so we know that this executable has its own defense mechanism to prevent it from being debugged.</p>

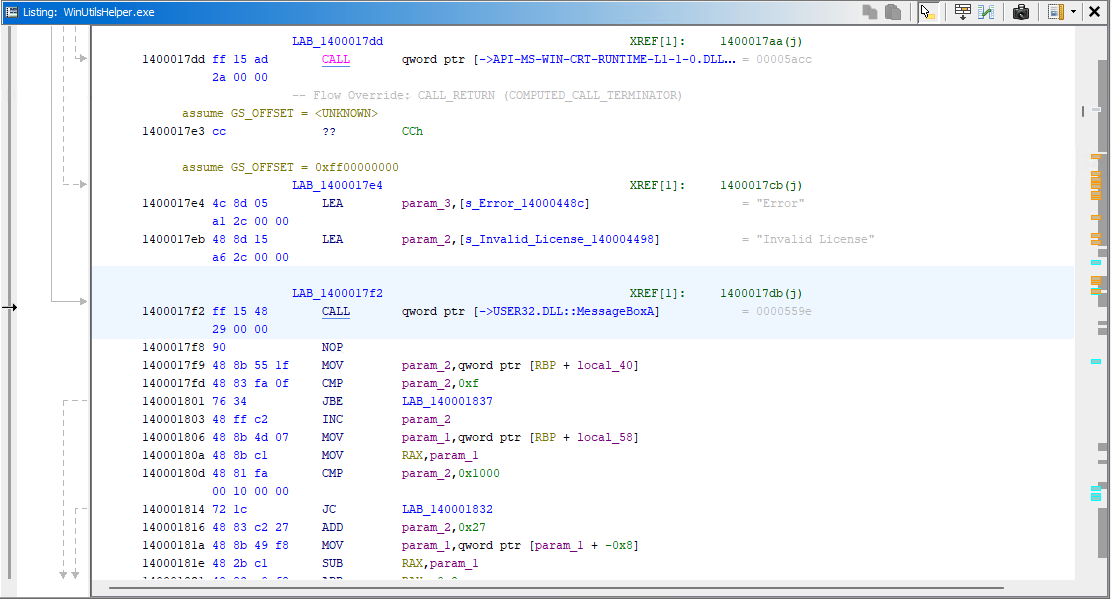
<p>Now, we go to the second memory location from where the MessageBoxA was referenced. The memory location is 1400017f2.</p>

<p><img src="/images/winutil-5.png" alt="Invalid License" /></p>

<p>As we can see on the Listing View in Ghidra, clicking on that memory location shows the string “Invalid License” which is the string we see upon inputting a string on the executable’s enter license key prompt.</p>

<p>I’m no expert in Reverse Engineering so by getting to this specific part of the function I can’t easily determine who calls who. So to try to understand it, I scroll up the listing view until I see the beginning of the function.</p>

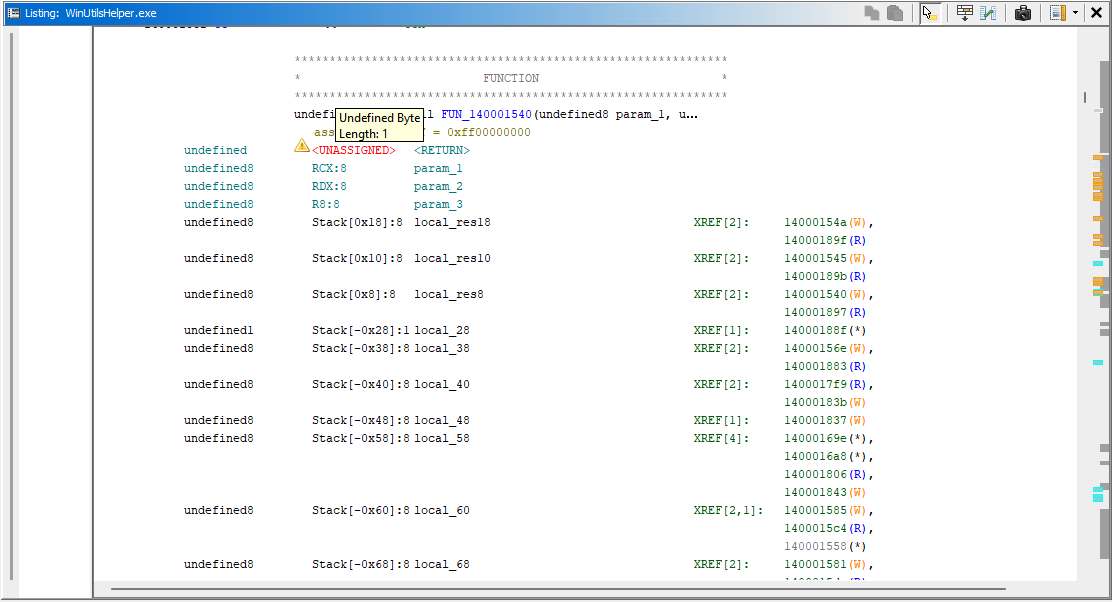
<p><img src="/images/winutil-6.png" alt="Start of Function" /></p>

<p>I saw the banner FUNCTION so I now know that I’m at the beginning of the function. This function accepts the three parameters and a lot of local variables. Like I said, I’m no expert so my thinking is maybe one of this local variable holds or store information about the license key then this value on this variable is used to compare it to user input.</p>

<p>I checked what value is passed on that local variable by clicking on the memory location in the XREF field on the right side of the local variable.</p>

<p><img src="/images/winutil-7.png" alt="Local Variable" /></p>

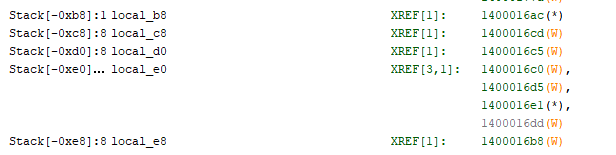
<p>On local_e0 we can see that it was referenced 3 times. I clicked 1400016c0 to go to that memory address.</p>

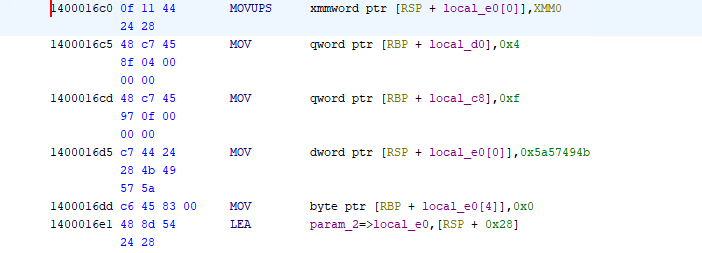
<p><img src="/images/winutil-8.png" alt="local_e0" /></p>

<p>Here we can see the value that uses or references local_e0. One thing that stood out of the rest is the value 0x5a57494b. So technically, 0x5a57494b is placed on the stack and Ghidra placed the label local_e0 to easily determine on how many bytes it needed to add from RSP to go to that specific address in the stack.</p>

<p><img src="/images/winutil-9.png" alt="ZWIK" /></p>

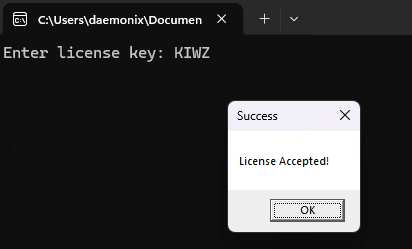
<p>Now if we hover the mouse in that hex value we can see that the character is ZWIK and since the stack is a LIFO structure I concluded that the license key is KIWZ.</p>

<p><img src="/images/winutil-10.png" alt="License Key" /></p>

<p>I’m not sure if how I solve this is correct or my thought process is correct but that’s how I came up with the answer. I’m still learning and I believe I’ll improve more on how to reverse engineer stuff!</p>]]></content><author><name>YadoreZ</name></author><category term="re" /><summary type="html"><![CDATA[After earning my GREM and PMRP, I thought of looking for a job that has Reverse Engineering or Malware Research. It’s been like 15days already and I received a 1 unfortunately and a lot of no response on all my application. So I thought to myself that, certification is certainly not enough to show how passionate or how much I wanted to be in Reverse Engineering field so I decided to learn Game Hacking from GuidedHacking (again! had to stop since I enrolled on a lot of courses last year and early this year) and also start with Crackmes.]]></summary></entry><entry><title type="html">GIAC Reverse Engineering Malware</title><link href="https://zerodaygamer.com/writeups/giac-reverse-engineering-malware/" rel="alternate" type="text/html" title="GIAC Reverse Engineering Malware" /><published>2025-05-01T21:26:28+08:00</published><updated>2025-05-01T21:26:28+08:00</updated><id>https://zerodaygamer.com/writeups/giac-reverse-engineering-malware</id><content type="html" xml:base="https://zerodaygamer.com/writeups/giac-reverse-engineering-malware/"><![CDATA[<p>My first GIAC that I acquire is GREM or GIAC Reverse Engineering Malware. I took this exam last March 31, 2025 and passed the exam with 91% score. This course was not sponsored by my current job instead this was self-funded. You might wonder why ? No reason at all, just want to have my first GIAC cert since I have self-funded other certs like OSCP before.</p>

<p>My background prior taking the exam are not that good in terms of Malware Analysis and Reverse Engineering. Although, I don’t have experience with those, I did take the TCM PMRP (Practical Malware Research Professional) prior taking the course and passed that one. My experience in cybersecurity is focus on Application Security, I do perform penetration testing of Web, Mobile and APIs but never I performed Reverse Engineering before. Since I wanted to work as a reverse engineer or have a career in reverse engineering, I decided to follow a path or rather I create a path that I will work on and that is why I enrolled on the course like TCM’s PMRP and GREM.</p>

<p>I enrolled on FOR610 course this January 3, 2025. My background with TCM’s PMRP do help since I already know the basic of Malware Analysis. Although, I do acquire knowledge from PMRP, the GREMs contain some topics that were never discussed on the PMRP course. Lenny, the course instructor, really do a great job at teaching the topics. I learned a lot. By the way, this is an on-demand course which meant that it is a self paced course and I get to decide when and where I will study.</p>

<p>After doing the course and labs, I took my first practice test on February 2025. I did the practice test with stock knowledge thinking I could easily ace this, oh boy I was wrong. I finished the exam with 63% score 10% below the passing mark of 73%. After taking my first practice test, I realized the importance of indexing. My theoretical skills or knowledge is not good, I easily forget the meaning of something but when it comes to labs / cyberlive there were no big issues at all so my focus was creating a good index and redo everything from the beginning. After a month of reviewing and creating an index, I was able to score 81% on my second practice test which is 1 week prior my exam schedule. I feel confident now and decided that I would go take the exam even though I only score 8% higher than the passing mark. My confidence is mainly because I know that I won’t have problem with Cyberlive, only with the theoretical questions.</p>

<p>During the exam, the first question, a theoretical one, would make my heart sink. I mean that question is something I did not encounter on the practice exam it was way different, the only think I can think of is “Dang, I rushed the exam and have not studied enough”. It took me 5-10minutes before I came up with the decision of skipping that haha. After skipping that one, I took a deep breath, calm myself and then continue with the rest of the exam. The exam is harder compare to the practice exam but like I said, cyberlive won’t be a problem to me since I also make sure that I am completely familiar with the tools and  how to navigate through them. My only problem is the theoretical one, I just thought of no matter how I index, some questions are just tough. After finishing the cyberlive, I comeback to the question I skipped, I believe that I just guess those since I really don’t know anymore.</p>

<p>The result is 91% way higher than what I thought. I am thankful that I got this score, it was worth it. The FOR610 course is great, it taught me a lot of things I needed to be good in Malware Analysis. I am planning on being great with reverse engineering so I will continue learning whether it is enrolling on some course or reading books.</p>

<p><img src="/images/grem.png" alt="GIAC Reverse Engineering Malware" /></p>]]></content><author><name>YadoreZ</name></author><category term="cert" /><summary type="html"><![CDATA[My first GIAC that I acquire is GREM or GIAC Reverse Engineering Malware. I took this exam last March 31, 2025 and passed the exam with 91% score. This course was not sponsored by my current job instead this was self-funded. You might wonder why ? No reason at all, just want to have my first GIAC cert since I have self-funded other certs like OSCP before.]]></summary></entry><entry><title type="html">Practical Malware Research Professional</title><link href="https://zerodaygamer.com/writeups/practical-malware-research-professional/" rel="alternate" type="text/html" title="Practical Malware Research Professional" /><published>2025-05-01T21:26:13+08:00</published><updated>2025-05-01T21:26:13+08:00</updated><id>https://zerodaygamer.com/writeups/practical-malware-research-professional</id><content type="html" xml:base="https://zerodaygamer.com/writeups/practical-malware-research-professional/"><![CDATA[<p>My first Malware Analysis certification is TCM Security’s Practical Malware Research Professional. The author of the course is Matt Kiely, a great instructor! I was able to learn and understand everything easily. The course, I would say, can be good for anyone who really are interested in Malware Analysis. From Static Analysis to Dynamic Analysis, everything you need to know will be taught on the course. His style of teaching is, he would allow you to solve everything on your own first then on the next part of the video he will then show you his own methodology.</p>

<p>The course overall is great, from basic to advance, he will teach you all the stuff you needed in order to perform a malware analysis. He will show you how you should approach a malware, how you should contain it, and what are the stuff to lookout for. From basic to advance analysis are all taught in the course, aside from that he will also teach you on how to setup your own lab and how to check what are the services the malicious program is looking for, and what should we use in order to properly identify the behavior of this program. For me, the module is enough in order to ace the exam, the exam is great! It provides you a malware sample and then analyse it and create a report, not a multiple choice exam instead you do your own analysis.</p>

<p>The exam result on my end took more than a week before I received it. The reason for that is because they are currently on tight schedule with limited people at that time but some received their result earlier. I took the exam once and good thing I passed it on first try, the only thing I would recommend for the exam is to make sure you can do everything on the lab on your own and confidently create a report of your analysis. If you’re good with that, then everything should workout fine.</p>

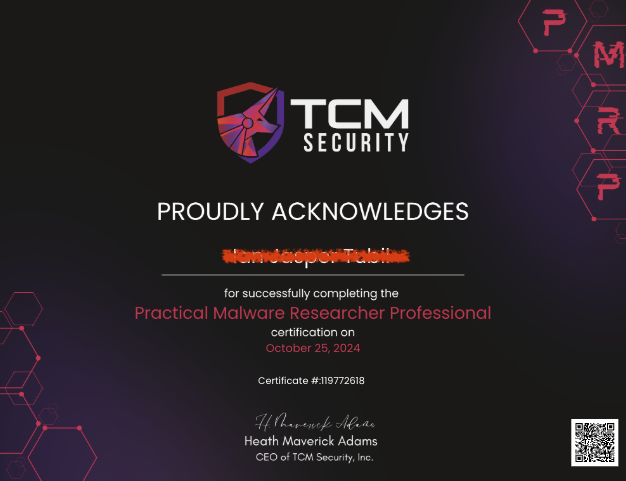
<p><img src="/images/pmrp.png" alt="Practical Malware Research Professional" /></p>]]></content><author><name>YadoreZ</name></author><category term="cert" /><summary type="html"><![CDATA[My first Malware Analysis certification is TCM Security’s Practical Malware Research Professional. The author of the course is Matt Kiely, a great instructor! I was able to learn and understand everything easily. The course, I would say, can be good for anyone who really are interested in Malware Analysis. From Static Analysis to Dynamic Analysis, everything you need to know will be taught on the course. His style of teaching is, he would allow you to solve everything on your own first then on the next part of the video he will then show you his own methodology.]]></summary></entry></feed>